


-
- English
- Deutsch
- Spanish
-
- General Diagnostics
- Treatment
- Tools/Materials
- Basic/General Knowledge
- Research
- Events
- Organisations
-
-
-
-
-
-

-
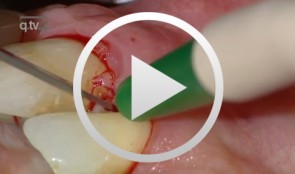

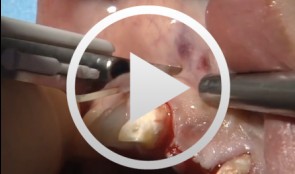
Periodontal regeneration at teeth 21 and 23 using EMD and cortical bone chips
Topoll, Heinz H.Contents: - Incisions using a microsurgical scalpel - Reflecting a buccal flap - Preparing papillary flaps using a microsurgical scalpel - Lifting off of the papillary flaps using a papillary elevator - Removing the granulation tissue using an ultrasound scaler - Cleaning the dental roots using manual instruments - Trying to dental root - Applying Emdogain - Mixing Bio-Oss and Emdogain - Introducing the Bio-Oss into both bone defects - Microsurgical suturing Materials Checklist: Cheek retractor Microsurgical scalpel blade holder Microsurgical scalpel blade Soniflex tips Bone rest Castroviejo microsurgical needle holder Suturing scissors Dental tweezers Microsurgical tweezers Monofilament suturing material 6/0 Seralene Pref gel Emdogain Bio-Oss -
Ridge augmentation in the periodontally involved dentition
Windisch, PéterContents: - Periodontal regeneration and alveolar -ridge augmentation using a connectivetissue graft - Implant insertion and augmentation - Implant re-entry and prosthetics Materials Checklist Emdogain, Bio-Oss, BioGide, Block fixating screw for autologous bone cylinder, 4/0 and 5/0 sutures, Resolut membrane Titanium pins, Autologous bone chips, 2 Replace Groovy Tapered 4, 3x13 mm implants -
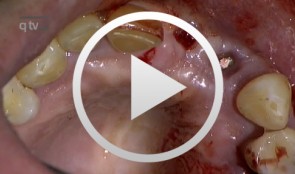
Defect Prevention following Extraction of a Maxillary Central Incisor
Zuhr, OttoContents: - Minimally invasive, atraumatic extraction of an anterior tooth - Buccal soft tissue augmentation using a modified tunneling technique - Socket preservation technique for conservation of the extraction socket - Provisional restoration and closure using modified suspension sutures Materials Checklist: Tunneling Knife® (Dr. Zuhr), No. 1 / No. 2 Keydent Microblade SR Geistlich Bio-Oss® Spongiosa, particle size 0.25 - 1 mm Geistlich Bio-Gide® membrane, 25 x 25 mm Seralene Blue 7/0 DS-15, 0.5 m sutures CV-5 Gore-Tex sutures -
Sinus Floor Augmentation with Autogenous Chin Bone Grafts
Schultze-Mosgau, Stefan / Neukam, Friedrich Wilhelm / Basting, GerdContent: In the maxillary incisor region, a sinus floor augmentation to enlarge the vertical bone supply may be indicated for a vertically reduced local bone height of less than 5 to 7 mm before procedures to rehabilitate masticatory function with an implant-bearing tooth replacement. For a single-sided deposit osteoplasty, the quantity of autogenous bone from the chin region is usually sufficient. The operative procedure of a single-sided lateral sinus floor augmentation is demonstrated with particulate spongious bone and alternatively with an autogenous block graft. The video also shows the operative method for a crestal sinus floor augmentation with the aid of the endoscopically controlled condensation technique. The advantages and disadvantages of the individual procedures are highlighted. In addition, the technique for harvesting chin bone transplants in different case examples is shown. Outline: - Operative technique for lateral sinus floor augmentation with autogenous particulate spongious bone - Operative technique for lateral sinus floor augmentation with autogenous block grafts - Crestal, endoscopically controlled sinus floor augmentation with condensation technique - Techniques for harvesting chin bone grafts - Range of indication for sinus floor augmentation - Lateral sinus floor augmentation - Operative technique of crestal, endoscopically controlled sinus floor augmentation - Operative technique of autogenous chin bone removal -
Bone Transplantation with Systemized Armamentarium
Streckbein, Roland -

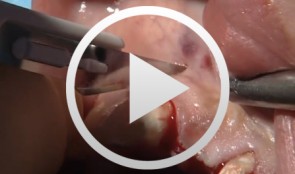
Regenerative Treatment of Class II Mandibular Furcation Defects
Heinz, BerndProcedure Case description: -Class II furcation defect at teeth 46 and 47 and gingival recessions at teeth 43 and 44 - Root planing using PerioSet - Incision technique - Cleaning furcation defect at tooth 46 - Pref Gel application, rinsing and Emdogain application - Insertion of Bio-Oss into the furcation space with an amalgam plugger after hydration - Condensation of the bone replacement material and application of an absorbable membrane (Bio-Gide) - Atraumatic suture closure using 6/0 Seralene Contents: This video demonstration shows the simultaneous treatment of recessions at teeth 43 and 44 and of class II furcation defects at teeth 46 and 47. After a brief case description, root planning is done using PerioSet. Next, an incision is made and the furcation defects are very carefully cleaned using hand instruments and ultrasonic scalers (Soniflex). The cleaned root surfaces and furcation defects are conditioned with Pref Gel (Straumann) for two minutes. The objective of conditioning is to remove the smear layer, to open the dentine tubules, and to enable surface demineralization. Moreover, this measure serves to optimize the contact between Emdogain and the root surface. After two minutes, the EDTA suspension is removed using physiological saline solution or water spray. Immediately afterwards, Emdogain is applied to the blood and saliva-free root surface. This procedure was also used to treat the furcation defect at tooth 47. Regenerative treatment of tooth 46 was performed since that tooth had a very extensive furcation defect. The defect was filled with Bio-Oss, which was applied using an amalgam plugger. Absorbable Bio-Gide was used for coverage of the furcation entrance. Finally, the wound was closed using loop sutures and single interrupted sutures. -
Regenerative Procedures for Optimized Esthetics at Tooth 11
Schlee, MarkusContents: - Exploration - Incision and Flap Mobilization - Palatal Flap Preservation with Interdental Tissue Preservation - Detoxification and Concrement Removal at 11 - Harvesting of Autogenous Bone Chips from the Spina Nasalis - Conditioning of the Root Surface with EDTA-Gel - Application of Emdogain and Filling of the Bone Defect - Wound Closure Synopsis After Finishing the Initial Treatment for Aggressive Periodontitis, Regenerative Treatment of a Tunnel-Shaped Pocket at Tooth 11 was attempted. Rotation and Crowding of the Buccally Inclined Tooth represented a favorable Etiological Factor. The patient did not wish to receive Orthodontic Treatment to eliminate this Causal Factor after Completion of Primary Treatment. Treatment was therefore limited to the Surgical Regeneration Attempt. The Interdental Space was larger than 3 mm and the Bone Pocket was a mostly Three-Walled Structure, so the Chances of Success were considered to be good. Exploration was first performed to identify the Course of the Defect Margins. Exact knowledge of the Bone Anatomy in all three Planes is essential to successful Incision Planning. A Tunnel-Shaped Defect delimited by Bone in the Region of Tooth 11 with good chances of Periodontal Regeneration was found. A major Challenge of this Procedure is the need to keep the Defect completely covered with Soft Tissue throughout the Healing Process. Cortellini's Papilla Preservation Technique was used for this Purpose. After Incision and Flap Mobilization, it became evident that the Defect only had two Walls in the Coronal Region and that Bone was lacking in the Buccal Region. According to the current Data on Periodontal Regeneration, the Attachment Gain achieved using an Enamel Matrix Protein (Emdogain®) alone can be just as good as that achieved using Emdogain and Bone Graft Material combined. Still, we elected to use a Combination Technique in the Present Case because it provides better Papillary Support. The Graft Material consisted of Autogenous Bone Chips from the Spina Nasalis, which can easily be harvested by Means of the Piezo Technique After gentle Detoxification, the Root Surface was treated with Emdogain. The Defect was then filled with Autogenous Bone Chips and closed by Microsurgical Suture Techniques. Six months after Surgery, Partial Regeneration of the Papilla can be seen. -
Combined implant treatment with soft and hard tissue management
Schlee, MarkusProcedure - Soft and hard tissue management - Implantodontic treatment - Case documentation Contents: - History - Patient hadn't seen a dentist for 15 years - Has been on Marcumar since developing a blood clot in 1997 - His general practitioner extracted teeth and performed conservative dentistry during the last year - Heavy smoker (30 cigarettes a day) - Prothrombin time (Quick's value): 40 - Premedication: Augmentan 750/125 tablets. -
Bone Transfer
Streckbein, RolandContent: Description of system and instruments. The patient had a considerable bone deficit at tooth 21. Augmentation was therefore required and was carried out using calibrated instruments. The augmentation site was prepared using instruments that matched the tools used to harvest the cylindrical bone graft at the donor site. This perfect match between the augmentation region and the bone transplant accelerated osseointegration, there by shortening the required waiting time for implant placement. -
Sinus Bone Augmentation with PRP
Schultze-Mosgau, StefanContents - Incision technique for lateral sinus floor augmentation - Creation of a lateral bone window in the facial maxillary sinus wall - Maxillary sinus floor elevation - Chin bone graft harvesting - Retromolar bone harvesting - Sinus floor augmentation using autologous bone, beta- tricalcium phosphate (1:1) and PRP Synopsis: Maxillary sinus augmentation may be indicated in cases where it is desirable to increase the vertical bone stock in the upper lateral tooth region. Maxillary sinus floor augmentation entails the implantation of autologous bone or bone replacement material in the spaces between the bony floor and elevated membrane of the maxillary sinus. This video demonstrates the techniques for palatal incision, access preparation, and exposure of the facial wall of the maxillary sinus. A diamond drill is used to create a bony window in the facial wall of the maxillary sinus taking care not to perforate the sinus membrane. After completely detaching the basal parts of the membrane, the flap is advanced cranially using angular elevation instruments. Regarding the procedure for autologous bone grafting, the steps for incision, prepping and harvesting of monocortical chin bone transplants with a trephine drill are demonstrated. An alternative procedure for harvesting retromolar bone material is also shown. A bone mill is used to particulate the autologous bone material. The autologous bone chips are then mixed 1:1 with beta-tricalcium phosphate (and PRP) and inserted in the sinus floor.