


-
- English
- Deutsch
- Spanish
-
- General Diagnostics
- Treatment
- Tools/Materials
- Basic/General Knowledge
- Research
- Events
- Organisations
-
-
-
-
-
-

Free content
-
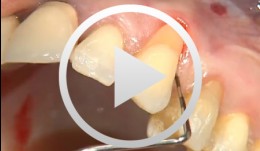

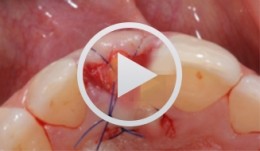
Covering a Recession with a Soft Tissue Transplant
Heinz, Bernd / Jepsen, SörenObjectives: Use of a soft tissue graft for recession coverage at tooth 23 and for gingival augmentation. Content: 1. Incision around tooth 23, intra-sulcular preparation, mobilization of coronal sliding flap, and pre-flap preparation. 2. Root smoothing, reduction of ground cavity with diamond burs from Perioset system. 3. Preparation and harvesting of connective tissue flap from palate, Emdogain application, and wound closure. 4. Placement of interrupted interdental sutures for fixation of connective tissue flap. -

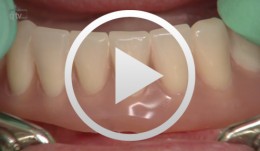
Soft Tissue Management in the Aesthetic Zone
Daniel ThomaExpert presenter PD Dr. Daniel Thoma is a Head of Academic Unit at the Clinic for Fixed and Removable Prosthodontics and Dental Material Sciences, University of Zurich, Switzerland. Long-term successful outcomes with implant therapy are based on a number of parameters. Among these, the critical assessment of the peri-implant soft tissues and subsequent therapeutical interventions are considered key factors. -
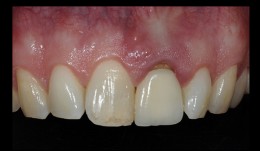

Aesthetic upper anterior implant placement case
Dr. Dominik BüchiDr. Dominik Büchi performed a ridge preservation to keep the soft tissue volume. He then placed an implant 8 weeks later with simultaneous GBR. The final emergence profile was created by a fixed provisional crown. -
Fiberglass frameworks in removable prosthodontics
Bücking, Wolfram -
-

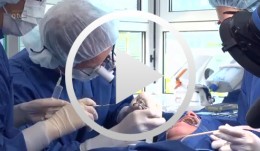
REAL-TIME NAVIGATION: THE BEGINNING OF A NEW ERA IN GUIDED IMPLANT SURGERY
Objectives: To demonstrate that dynamic guided surgery is as predictable as conventional surgery. Methods: Partially edentulous patients requiring a fixed rehabilitation were selected for this pilot study. No specific contraindications were established, and smokers were not excluded. An impression was taken pre-operatively using an irreversible hydrocolloid (Cavex CA37®) to fabricate a diagnostic cast for moulding the surgical stent (NaviStent®). Afterwards, a standard cone-beam CT (CBCT) scan was made with the NaviStent® in place using a Planmeca Promax 3-D Max®. Images were converted into DICOM files and transformed into a 3-D virtual model using the Navident® software. The potential implant locations were planned in a prosthesis-driven way. For preparing the osteotomy, the drilling axis of the handpiece and the twist drills were calibrated. The osteotomies were prepared at low speed using a high level of cooling. The navigation software guided the drilling procedure in real time. Before installing implants, an extra calibration procedure was performed for tracking the implant. The aim of this pilot study was to determine the clinical outcome up to 12 months post-operatively for implants installed using the Navident® guided surgery system. Results: Partially edentulous men (n = 6) and women (n = 7) were included in this pilot study (mean age 52.15 years; range 20–75). Out of these 13 patients, two were current smokers of more than 10 cigarettes per day. Twenty implants were inserted. No mechanical or biological complications occurred during the surgical procedure, and no major complaints were reported, such as hemorrhage, sinus pathology or severe post-operative pain. No implants were lost up to 1 year after insertion, resulting in 100% implant survival. Conclusions: Based on the results of this pilot study, real-time navigation is a promising technique. However, there is not yet enough evidence to show that the method is as safe and predictable as conventional implant surgery. -
Live surgery Surgical treatment of bone necrosis
Schultze-Mosgau, StefanOutline: - Surgical wound debridement - Sequestrotomy - Preparation of the soft-tissue bed - Plastic, tension-free, saliva-proof wound closure List of materials Basic surgical tool set: - Surgical blade - Preparation scissors - Pair of tweezers - Suture materials -
Implantation with Simultaneous Augmentation
Grunder, UeliProcedure: - Case evaluation - Incision technique - Implant placement - Membrane adjustment and fixation - Introduction of replacement material - Flap mobilization - Suture technique Contents: Implantation was desired for replacement of a missing upper canine tooth and the adjacent lateral incisor tooth. The initial case evaluation revealed a relatively narrow gap between these two teeth in addition to extensive hard and soft-tissue defects. We selected an incision technique that made it possible to do the augmentation work yet subsequently achieve a tension-free flap closure. Since the bony defect was large while the available space was limited, we had to go for the best possible compromise in regard to implant insertion. After the implants had been inserted, augmentation was carried out using a non-absorbable, titanium-reinforced membrane, bone replacement material, and an absorbable membrane. Extreme flap mobilization was needed to achieve flap closure. An optimal suture technique was used to complete the surgery. -

-
-
Cell-to-Cell Communication - Inflammatory Reactions
Stadlinger, Bernd / Terheyden, HendrikVisualizing the invisible while experiencing a fascination with science is the great challenge that Cell-to-Cell Communication, representing an all-new genre, has set out to meet. A spectacularly sophisticated computer animation in HD quality depicts the highly complex processes of intercellular interaction during an inflammatory periodontal reaction complete with the messenger molecules implicated. The various cell types constitute the main cast of the film, using a finely tuned communication process in their quest to destroy the bacterial invaders, with messenger molecules as supporting cast. A stunning didactic and dramatic experience! Outline: - Biofilm - Gingivitis and the Innate Immune Defense - Periodontitis and the Adaptive Immune Defense - Cleaning and Regeneration -
Bone Spreading, Bone Condensing
Streckbein, RolandContent: Surgical flap creation and elevation; Use of drill template for exact determination of implant position; Implant site creation; Site preparation / tapping; Bone compaction; Insertion of the implants; Impression-taking; Wound closure; Later implant insertion; Dental lab work; Creating the model with laboratory implants; Shaping the bar frame; Adapting the laser welded frame to the model; Manufacturing the tooth replacement, Fitting the bar into the tooth replacement; Finishing work. -
Esthetic and Restorative Dentistry - Ceramic Materials
Terry, Douglas A. -
Short and narrow implants, how far can we go?
Christoph Hämmerle, José NartIn this webinar moderated by Prof Ronald Jung and Dr. Adrián Guerrero the expert presenters Prof. Christoph Hämmerle and Dr. José Nart discuss about the importance and benefits of using short and narrow implants. -
-
Periodontal Preserve Therapy (Examples)
Clotten, StefanContent: - Periodontal maintenance therapy for teeth 34 and 35, including the regeneration of a bone defect using bone replacement material, collagen membrane and sutures. - Curettage for treatment of periodontal pockets. - Treatment of gingival pressure sores caused by tight-fitting orthodontic apparatus. - Incision of buccal attachment to relieve gingival pressure for elimination of gingival recession.
Most Popular
-

Distraktionsosteotomie Unterkiefer
Schleier, Peter / Schultze-Mosgau, StefanGliederung: - Indikationsstellung und Operationsplanung - Schnittführung und Osteotomie - Distraktorapplikation - Wundverschluss und postoperatives Regime. Materialliste V2-Distraktor, Medartis (Schweiz) 2,0mm Osteosyntheseschrauben, Medartis (Schweiz) Vicryl Nahtmaterial, Ethilon (USA) -
Frontzahnaufbau bei Klasse IV-Defekt
Hugo, Burkard -

Mikrochirurgische laterale Sinusbodenelevation
Nölken, RobertGliederung: - Schnittführung - Lappenmobilisation - Laterale Sinusfensterpräparation - Elevation der Schneiderschen Membran - Implantatbettaufbereitung - Knochenspanentnahme im Unterkieferwinkel - Füllung des Sinuslifts mit autologen Knochenchips - Implantatinsertion - Deckung der lateralen Sinuskavität mit Kollagenmembran - Wundverschluss. Materialliste: - Zeiss Pro Dent Mikroskop mit Strahlenteiler und Panasonic 3 CCD Kamera - Skalpellhalter (Ustomed) mit Swann-Morton Klinge 15C und 12D - Schmales Raspatorium (Hu-Friedy) - Mikrosauger (Luer Lock Suction Tip, American Dental Systems) - Einwegabsaugschlauchset (Bexamed) - Einweg-Abdeckset Lindau (Aescologic) - Piezosurgery mit diamantierter Kugel (Mectron) - Mikropinzette (Hu-Friedy) - Exkavator (Martin) - Parodontometer mit 1 mm-Skalierung (Hu-Friedy) - OsseoSpeed Implantat-Set von Dentsply Implants: Markierungsbohrer; Spiralbohrer 2 mm; Tiefenmesssonde; Pilotdrill 2/3,2 mm; Spiralbohrer 3,2 mm; Konischer Bohrer 3,2/5 mm; OsseoSpeed TX Implantat 5.0 x 11 mm; Verschlussschraube 4.5/5 mm - Columbia Kürette (Ustomed) - Micross Scraper (META) - Nadelhalter (Ustomed) - Wundhaken nach Langenbeck (Ustomed) - Kelly Schere (Ustomed) - Endo Hand-Plugger nach Buchanan (American Dental Systems) - Resorbierbare Kollagenmembran (Resodont von Resorba) - Ethilon 5-0 FS-3 (Ethicon) - Prolene 6-0 DA-2 (Ethicon)
Recommended to You
-
Clinical implant prothodontics - Part II
Weigl, Paul / Trimpou, Georgia -
Preparation of Crowns and Bridges
Neumeyer, Stefan -
Kommunikation der Zellen: Die parodontale Regeneration
Stadlinger, Bernd / Terheyden, HendrikAnders als Knochen unterliegen menschliche Zähne nicht dem Remodelling, also dem kontinuierlichen Auf- und Abbau. Diese Resistenz unserer Zähne gegenüber physiologischen Umbauprozessen ist bemerkenswert. Die Ursachen für dieses Phänomen liegen in Parodont und Wurzelzement. Welche Mechanismen dort wirksam werden und wie sich der Zahnhalteapparat, bestehend aus Gingiva, Alveolarknochen, Parodont und Wurzelzement bei Störungen regeneriert, wird im neuen 3D Wissenschaftsfilm "Die Parodontale Regeneration" beschrieben. Die Visualisierung dieser komplexen Prozesse ist für die universitäre Lehre sowie für die Klinik und Praxis von Interesse, da die einzelnen zellulären Interaktionen im Kontext eines Phasenverlaufs gezeigt werden. Erstmals werden im Rahmen dieses Films auch rasterelektronenmikroskopische Aufnahmen realer Zellen in Form von sogenannten "Steckbriefen" eingeblendet, die den Vergleich realer Zellen mit der computeranimierten Simulation ermöglichen. Gliederung: - Zementbildung - Kieferorthopädische Zahnbewegungen - Trauma und Parodontitis - Die parodontale Regeneration DVD 1: Expertenversion, Laufzeit ca. 14 Minuten; DVD 2: Patientenversion, Laufzeit ca. 13 Minuten